> ## Documentation Index
> Fetch the complete documentation index at: https://autorender.io/docs/llms.txt
> Use this file to discover all available pages before exploring further.
# Strapi
> Use Autorender as your Strapi Media Library upload provider, and browse and import existing Autorender assets into Strapi without re-uploading any bytes.
**Key type:** use a **private key** (see [Create an API Key](/docs/create-an-api-key)). It's entered once in Strapi's admin Settings page, stored server-side, and every Autorender API call happens from the Strapi backend — it never reaches the public-facing site. Admins with the **Settings: Change** permission can view and copy the key from the Settings page, since they could already read it directly from the database.
`@autorender/strapi` adds an Autorender-powered media library to your Strapi admin panel. Browse your Autorender folders and files without leaving Strapi, import assets by reference with a single click, and optionally route every new Strapi upload straight to Autorender instead of local disk storage.
## How does it work?
* **Autorender Media Library page** — browse your Autorender folders and files, and either **import** existing assets into Strapi's own Media Library, or **upload** a new file straight to Autorender.
* **Import by reference** — importing does not copy or re-host file bytes. Strapi stores the Autorender CDN URL directly in the Media Library entry.
* **Upload provider (optional)** — when enabled, new files uploaded anywhere in Strapi (Content Manager, Media Library, anywhere) are sent to Autorender instead of Strapi's default storage.
This plugin doesn't implement signed URLs or private files — Autorender always returns plain, permanent, public CDN links.
## Prerequisites
* A Strapi project (**v5 or later**)
* Node.js 18 or later
* Administrator access to your Strapi instance
* An Autorender workspace and a private API key — see [Create an API Key](/docs/create-an-api-key)
***
## 1. Install the plugin
```bash npm theme={null}
npm install @autorender/strapi --save
```
```bash yarn theme={null}
yarn add @autorender/strapi
```
```bash pnpm theme={null}
pnpm add @autorender/strapi
```
```bash bun theme={null}
bun add @autorender/strapi
```
Rebuild your Strapi instance so the admin panel picks up the plugin:
```bash theme={null}
npm run build
npm run develop
```
An **Autorender** entry appears in the main navigation sidebar, and an **Autorender** section appears under **Settings**.
***
## 2. Configure the plugin
Open **Settings → Autorender** in the Strapi admin panel.
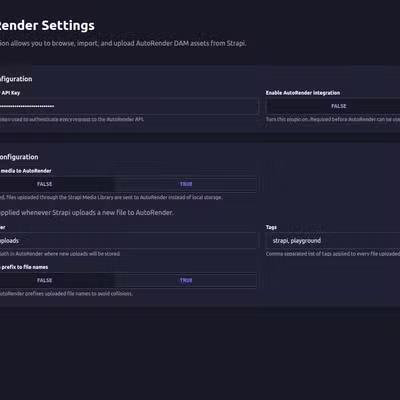 Under **Basic Configuration**:
| Field | Description |
| :-------------------------------- | :------------------------------------------------------------------------------------------------------------------------------------ |
| **Autorender API Key** | The private key used to authenticate every request to the Autorender API. |
| **Enable Autorender integration** | The master switch for the plugin. Must be on for Autorender to be usable as an upload provider or for the Media Library page to work. |
Click **Save**.
The API base URL is fixed and not configurable — Autorender's REST API only has one endpoint, so there's nothing to set.
***
## 3. (Optional) Route new uploads to Autorender
Still on **Settings → Autorender**, under **Upload Configuration**:
| Field | Description |
| :---------------------------------- | :--------------------------------------------------------------------------------------------------------------------------------------------------------------------------- |
| **Upload new media to Autorender** | When enabled, every file uploaded through the Strapi Media Library is sent to Autorender instead of local storage. Doesn't retroactively migrate files you already uploaded. |
| **Upload Folder** | A base folder path in Autorender under which new uploads are stored, e.g. `/strapi-uploads`. |
| **Tags** | A comma-separated list of tags applied to every file uploaded from Strapi. |
| **Add random prefix to file names** | When enabled, Autorender prefixes uploaded file names to avoid collisions with existing files of the same name. |
***
## 4. Browse, import, and upload Autorender assets
Open the **Autorender** page from the main sidebar.
Under **Basic Configuration**:
| Field | Description |
| :-------------------------------- | :------------------------------------------------------------------------------------------------------------------------------------ |
| **Autorender API Key** | The private key used to authenticate every request to the Autorender API. |
| **Enable Autorender integration** | The master switch for the plugin. Must be on for Autorender to be usable as an upload provider or for the Media Library page to work. |
Click **Save**.
The API base URL is fixed and not configurable — Autorender's REST API only has one endpoint, so there's nothing to set.
***
## 3. (Optional) Route new uploads to Autorender
Still on **Settings → Autorender**, under **Upload Configuration**:
| Field | Description |
| :---------------------------------- | :--------------------------------------------------------------------------------------------------------------------------------------------------------------------------- |
| **Upload new media to Autorender** | When enabled, every file uploaded through the Strapi Media Library is sent to Autorender instead of local storage. Doesn't retroactively migrate files you already uploaded. |
| **Upload Folder** | A base folder path in Autorender under which new uploads are stored, e.g. `/strapi-uploads`. |
| **Tags** | A comma-separated list of tags applied to every file uploaded from Strapi. |
| **Add random prefix to file names** | When enabled, Autorender prefixes uploaded file names to avoid collisions with existing files of the same name. |
***
## 4. Browse, import, and upload Autorender assets
Open the **Autorender** page from the main sidebar.
 * Use the folder cards or the search box to find the assets you want. Folders can nest — clicking one shows its subfolders and files, with a breadcrumb trail to navigate back up.
* Select one or more assets by clicking a tile or its checkbox, then click **Import selected** to create the corresponding entries in Strapi's own Media Library.
* Or click **Upload** to add a new file straight to Autorender without leaving Strapi — it uploads into whichever folder you're currently browsing.
Deleting the Strapi entry does not delete the underlying Autorender asset, and editing the asset in Autorender is not reflected automatically in Strapi — you'd need to re-import it.
***
## 5. Grant access to other roles (optional)
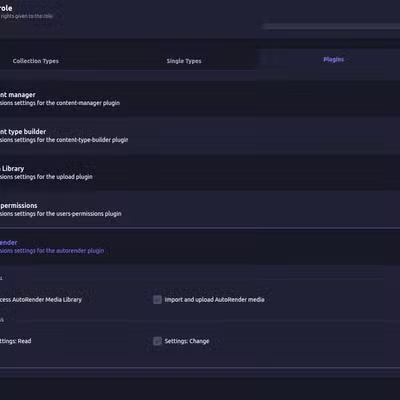
By default, only Super Admins can see and use the Autorender pages. To grant access to other admin roles, go to **Settings → Administration Panel → Roles**, pick a role, and enable the permissions you want under the **Autorender** section.
* Use the folder cards or the search box to find the assets you want. Folders can nest — clicking one shows its subfolders and files, with a breadcrumb trail to navigate back up.
* Select one or more assets by clicking a tile or its checkbox, then click **Import selected** to create the corresponding entries in Strapi's own Media Library.
* Or click **Upload** to add a new file straight to Autorender without leaving Strapi — it uploads into whichever folder you're currently browsing.
Deleting the Strapi entry does not delete the underlying Autorender asset, and editing the asset in Autorender is not reflected automatically in Strapi — you'd need to re-import it.
***
## 5. Grant access to other roles (optional)
By default, only Super Admins can see and use the Autorender pages. To grant access to other admin roles, go to **Settings → Administration Panel → Roles**, pick a role, and enable the permissions you want under the **Autorender** section.
 | Permission | What it allows |
| :---------------------------------------- | :----------------------------------------------------------------------------------------------------------------------------------------------------------------- |
| **Access Autorender Media Library** | Open the Media Library page and browse/search Autorender folders and files. Read-only. |
| **Import and upload Autorender media** | Click **Import selected** and **Upload**. Grant this alongside the permission above — without it, those buttons fail with a 403 even if the user can see the page. |
| **Settings: Read** / **Settings: Change** | Under the plugin's **Settings** category — control who can view (masked API key) or edit the Autorender configuration. |
***
## 6. Allow Autorender's CDN in your CSP
`config/middlewares.js` only controls the Content Security Policy on responses Strapi itself serves — the admin panel and Strapi's own API. To let the **admin panel** load images and video from Autorender's CDN, extend it there:
```js config/middlewares.js theme={null}
module.exports = [
{
name: 'strapi::security',
config: {
contentSecurityPolicy: {
useDefaults: true,
directives: {
'connect-src': ["'self'"],
'img-src': [
"'self'",
'data:',
'blob:',
'assets.autorender.io', // Replace with your custom domain, if you use one
],
'media-src': [
"'self'",
'data:',
'blob:',
'assets.autorender.io', // Replace with your custom domain, if you use one
],
upgradeInsecureRequests: null,
},
},
},
},
// Keep your other middleware entries here
];
```
Every Autorender API call happens server-side, so `connect-src 'self'` is enough — you only need to extend `img-src` and `media-src`.
If you render Strapi media from a **separately deployed frontend** (a Next.js app, a static site, anything that isn't the Strapi admin panel), this config has no effect on it — that frontend sets its own CSP header, if it sets one at all. Add `assets.autorender.io` to that frontend's own `img-src` and `media-src` directives instead.
***
## Troubleshooting
* **"Autorender integration is disabled"** — turn on **Enable Autorender integration** under Settings → Autorender and save.
* **"Missing Autorender API key"** — add a valid private key under Settings → Autorender.
* **Browsing can see assets, but "Import selected" / "Upload" return a 403** — see [step 5](#5-grant-access-to-other-roles-optional): the two Media Library permissions are separate.
* **Browsing fails with a generic network error, but works on retry** — the plugin retries transient connection failures automatically for browsing (idempotent requests) only. A failure that survives several retries usually means Autorender is unreachable or the API key is invalid.
* **An import or upload fails with a generic network error** — writes are never retried automatically, since retrying one whose response was lost could create a duplicate asset. Confirm whether it actually completed in Autorender before retrying yourself.
* **An imported asset shows as a generic file instead of an image** — the plugin infers a usable mime type from Autorender's metadata, falling back to the file extension. If it still doesn't render, check that Autorender reports a correct format for that file.
## Next steps
Serve AVIF or WebP per browser with `f_auto` on the CDN URLs this plugin inserts.
Control width, height, and fit on every delivery URL.
| Permission | What it allows |
| :---------------------------------------- | :----------------------------------------------------------------------------------------------------------------------------------------------------------------- |
| **Access Autorender Media Library** | Open the Media Library page and browse/search Autorender folders and files. Read-only. |
| **Import and upload Autorender media** | Click **Import selected** and **Upload**. Grant this alongside the permission above — without it, those buttons fail with a 403 even if the user can see the page. |
| **Settings: Read** / **Settings: Change** | Under the plugin's **Settings** category — control who can view (masked API key) or edit the Autorender configuration. |
***
## 6. Allow Autorender's CDN in your CSP
`config/middlewares.js` only controls the Content Security Policy on responses Strapi itself serves — the admin panel and Strapi's own API. To let the **admin panel** load images and video from Autorender's CDN, extend it there:
```js config/middlewares.js theme={null}
module.exports = [
{
name: 'strapi::security',
config: {
contentSecurityPolicy: {
useDefaults: true,
directives: {
'connect-src': ["'self'"],
'img-src': [
"'self'",
'data:',
'blob:',
'assets.autorender.io', // Replace with your custom domain, if you use one
],
'media-src': [
"'self'",
'data:',
'blob:',
'assets.autorender.io', // Replace with your custom domain, if you use one
],
upgradeInsecureRequests: null,
},
},
},
},
// Keep your other middleware entries here
];
```
Every Autorender API call happens server-side, so `connect-src 'self'` is enough — you only need to extend `img-src` and `media-src`.
If you render Strapi media from a **separately deployed frontend** (a Next.js app, a static site, anything that isn't the Strapi admin panel), this config has no effect on it — that frontend sets its own CSP header, if it sets one at all. Add `assets.autorender.io` to that frontend's own `img-src` and `media-src` directives instead.
***
## Troubleshooting
* **"Autorender integration is disabled"** — turn on **Enable Autorender integration** under Settings → Autorender and save.
* **"Missing Autorender API key"** — add a valid private key under Settings → Autorender.
* **Browsing can see assets, but "Import selected" / "Upload" return a 403** — see [step 5](#5-grant-access-to-other-roles-optional): the two Media Library permissions are separate.
* **Browsing fails with a generic network error, but works on retry** — the plugin retries transient connection failures automatically for browsing (idempotent requests) only. A failure that survives several retries usually means Autorender is unreachable or the API key is invalid.
* **An import or upload fails with a generic network error** — writes are never retried automatically, since retrying one whose response was lost could create a duplicate asset. Confirm whether it actually completed in Autorender before retrying yourself.
* **An imported asset shows as a generic file instead of an image** — the plugin infers a usable mime type from Autorender's metadata, falling back to the file extension. If it still doesn't render, check that Autorender reports a correct format for that file.
## Next steps
Serve AVIF or WebP per browser with `f_auto` on the CDN URLs this plugin inserts.
Control width, height, and fit on every delivery URL.